
Contents12
- Short answer — delegate the nameservers to Netlify DNS
- How DNS delegation works — who holds the address book
- Onamae.com DNS vs Netlify DNS vs Cloudflare DNS
- Connection steps — 10 minutes of actual work, up to 48 hours of propagation
- Step 1: Register a domain at Onamae.com
- Step 2: Run Add custom domain in Netlify
- Step 3: Turn on Netlify DNS and copy the nameservers
- Step 4: Switch the nameservers to Netlify on Onamae.com
- Step 5: Wait for DNS propagation and the HTTPS certificate
- Gotchas — four common stumbles
- FAQ
- Closing
2026 update: A post ported over from the old VuePress blog. The skeleton of the procedure hasn’t changed, but the Netlify / Onamae.com UI screenshots are from 2021. Cloudflare Pages + Cloudflare DNS is a common pairing now too, so a short comparison is added at the end.
Pointing an Onamae.com domain at a Netlify site is the kind of task you trip over on the first attempt if the UI isn’t familiar. The two things that snag people are pretty consistent: “where do I change the nameservers”, and “is it slow because it’s working or because it isn’t”.
This post tries to clear both up before you start clicking, so the order is: how DNS works, the connection steps, then how to confirm propagation. The Netlify deploy itself is assumed to be done already, per Setting up a static site with VuePress, GitHub, and Netlify.
Short answer — delegate the nameservers to Netlify DNS
The shortest path for connecting an Onamae.com domain to Netlify is to rewrite the Onamae.com nameservers to the four Netlify DNS ones.
The reason is that Netlify takes over DNS-record management (A / AAAA / CNAME), so SSL issuance, apex-domain handling, and adding subdomains all run more or less on autopilot. You only need to write records yourself if you’ve chosen the delegate to a separate DNS (e.g. Cloudflare DNS) and CNAME to Netlify layout.
If you’re undecided: Netlify DNS for delegation, Cloudflare DNS if you want to bundle multiple services under one domain. That’s the dividing line.
How DNS delegation works — who holds the address book
DNS is the distributed database that resolves “domain name → server IP”. A nameserver is the authoritative source for those lookups.
Right after you buy a domain at Onamae.com, Onamae.com itself is the authoritative source (the primary DNS). Switching the nameservers to Netlify DNS is what “changing nameservers” means, and from that point on the A / CNAME records live on the Netlify side.
Onamae.com DNS vs Netlify DNS vs Cloudflare DNS
| Angle | Onamae.com DNS (default) | Netlify DNS (delegated) | Cloudflare DNS (delegated) |
|---|---|---|---|
| Setup effort | Hand-write A / CNAME | Records generated automatically | Hand-write your own CNAME |
| Fit with Netlify | OK | The official short path | Good (CNAME flattening supported) |
| HTTPS certificate | Automatic on Netlify | Automatic on Netlify | Automatic on Netlify |
| CDN / WAF | No | No | Yes (via Cloudflare) |
| Email / other services | Slightly awkward | Awkward | Easy |
| 2026 popularity | △ | ◯ | ◎ |
If you’re stuck, walk down the table: “only using Netlify → Netlify DNS”, “want email or another service on the same domain too → Cloudflare DNS”. That keeps the decision stable.
Connection steps — 10 minutes of actual work, up to 48 hours of propagation
The actual work starts here. The clicking part takes around 10 minutes; DNS taking effect everywhere can take up to 48 hours (in practice it’s usually done within a few hours).
Step 1: Register a domain at Onamae.com
On the Onamae.com homepage, type in the domain name you want. For non-.com TLDs, select the TLD explicitly.

In the results, tick the TLD you want and proceed to pricing confirmation.

On the next screen — the server-selection step — pick don’t use one, since hosting is going to Netlify. Don’t accidentally sign up for a rental server here (an annual fee straight down the drain).
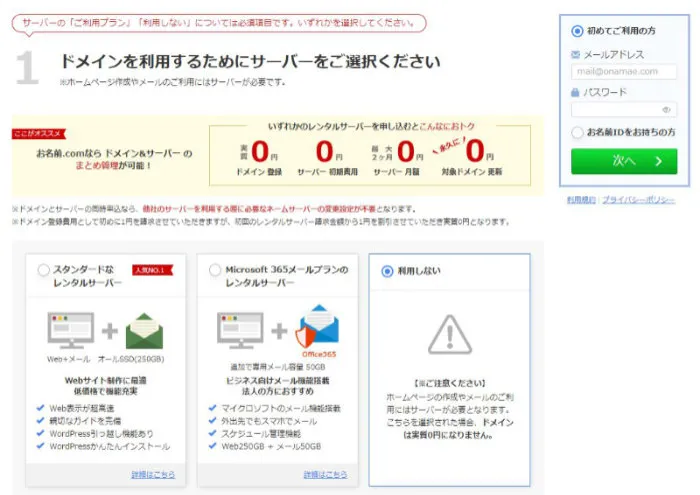
Once payment is done, the domain is yours. Whois proxy is included free, so you can leave it on.
Step 2: Run Add custom domain in Netlify
From the target Netlify site’s overview, open Domain settings.
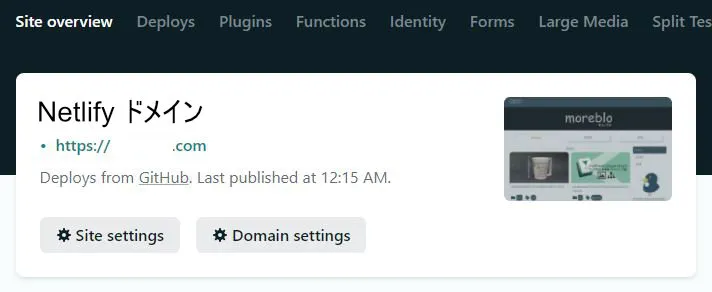
Click Add custom domain, type in the domain you registered (as the apex, e.g. example.com), and click Verify. That takes you to the ownership-check screen.
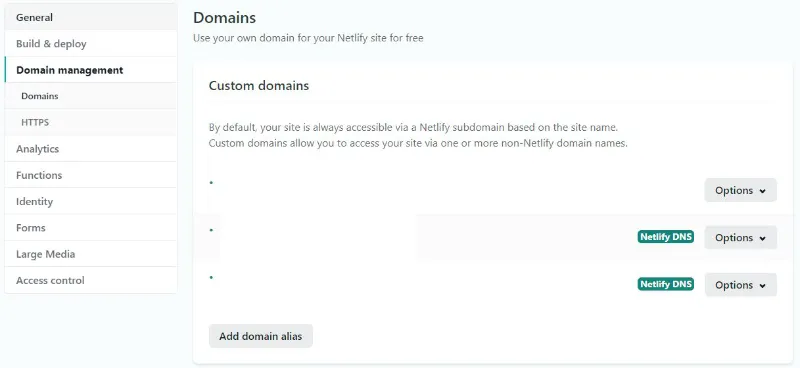
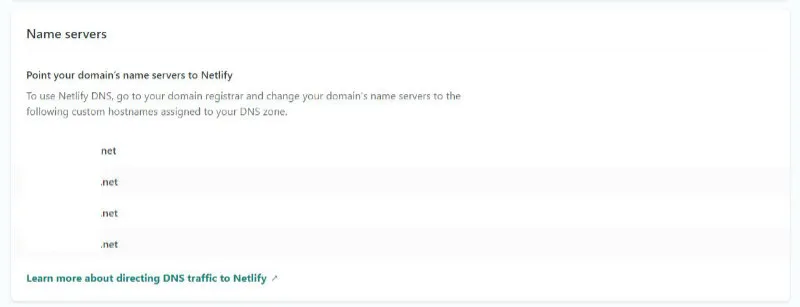
Step 3: Turn on Netlify DNS and copy the nameservers
Right after adding the domain, you’ll see Check DNS configuration. Open Options → Set up Netlify DNS to enable Netlify DNS.
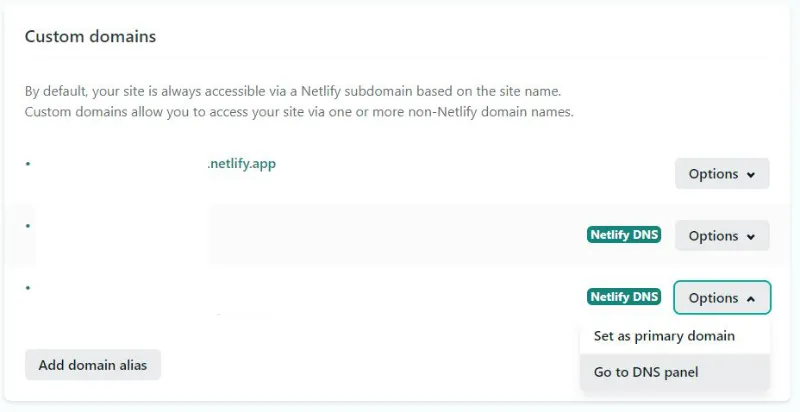
A few confirmation dialogs follow — read through them as you go. At the end, four FQDNs (shaped like dns1.p0X.nsone.net) appear under Name servers. Leave this browser tab open and copy them.
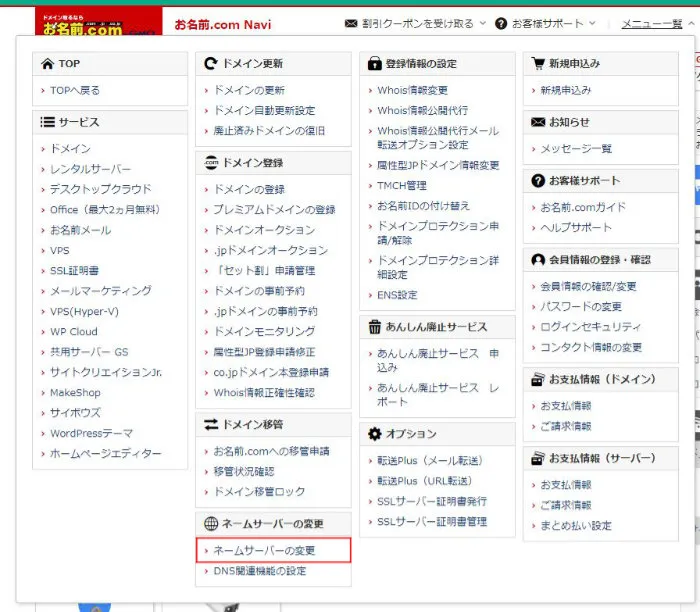
Step 4: Switch the nameservers to Netlify on Onamae.com
In another tab, log into Onamae.com Navi. From the top-bar menu → change nameservers.
Tick the target domain, pick the “Other” tab, and paste the four nameservers from Netlify into the nameserver fields, top to bottom.
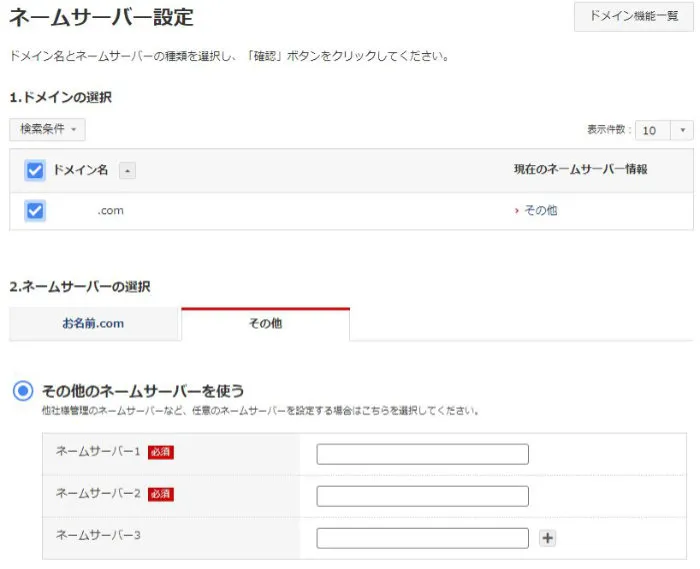
Click confirm and a “change request received” email arrives. That’s the active work done.
Step 5: Wait for DNS propagation and the HTTPS certificate
Propagation lands anywhere from a few minutes to 48 hours. On Netlify’s side, once DNS finishes propagating, Let’s Encrypt certificate issuance runs automatically, and after that you can reach the registered domain over HTTPS.
A few tips for confirming:
- If it’s still not visible after 30 minutes, try
nslookup example.com 1.1.1.1to check name resolution against a different DNS - If only your home network can’t see it, suspect the router or OS DNS cache
- If the certificate is still
pendingafter half a day, hit Renew certificate once from the Netlify Domains screen — that re-kicks issuance
Gotchas — four common stumbles
Short answer: mistyping the nameservers, redoing the settings before propagation finishes, misclicking the Onamae.com renewal emails, and running email on the same domain. Those four.
- Mistyping the nameservers: copy all four exactly. Order doesn’t matter, but watch the trailing
.and any leading whitespace - Redoing settings repeatedly before propagation: changing the Onamae.com side again mid-propagation because “it’s not working” just resets the TTL and stretches the wait. Give it half a day first
- Misclicking the renewal emails: Onamae.com sends a lot of ad emails about similar-looking domains. Build the habit of logging into Navi and checking the contract list to confirm whether a renewal notice is the real one
- Running email on the same domain: moving the whole nameserver to Netlify DNS means you have to re-create the MX records on the Netlify DNS side. If email is in play, delegating to Cloudflare DNS is safer (each provider’s MX UI may shift through 2026)
FAQ
Q. Can I connect this without Netlify DNS — i.e. leaving Onamae.com’s DNS in place?
A. Yes. In Onamae.com’s DNS-record settings, point the apex at A record 75.2.60.5, and point www at <site>.netlify.app via CNAME. Netlify’s load-balancer IP could change in the future, so for the long run, delegating to Netlify DNS or Cloudflare DNS is the safer move.
Q. What’s different about pointing through Cloudflare DNS instead? A. You delegate the nameservers to Cloudflare and point CNAME at Netlify from there. The upside is you can layer Cloudflare’s CDN and WAF on top, and it’s easier to co-locate multiple services (email, a separate host) on the same domain. Aulvem itself currently runs on Cloudflare Pages, with DNS managed on the Cloudflare side.
Q. How long does it take to propagate after switching nameservers? A. In practice, most of it lands within a few minutes to a few hours, with up to 48 hours as the outer bound. Mid-propagation, what you see depends on whether the network you’re on has cached the old record, so if it’s still not visible after half a day, try a different network.
Q. Is Netlify still a reasonable choice in 2026? A. Still reasonable, yes. That said, in 2026 Cloudflare Pages and Vercel are the more natural defaults for a new project. If you’re leaning on Netlify Forms or Identity, Netlify still holds up.
Closing
The real question behind pointing an Onamae.com domain at Netlify is “which DNS holds the authoritative copy of the domain”. Only using Netlify? Delegate to Netlify DNS — that’s the lightest path. Bundling multiple services? Go through Cloudflare DNS instead.
The screenshots are still the 2021 ones, but the basic flow — delegate the nameservers — hasn’t moved in 2026. Netlify itself is still around, and for projects leaning on Forms or Identity it’s still a top pick.
If you want to revisit the Netlify-side initial setup, see Setting up a static site with VuePress, GitHub, and Netlify.