Contents9
2026 update: A post ported over from the old VuePress blog. Netlify’s admin UI and pricing have moved on since 2021, so parts of this don’t line up one-to-one with the current product. The skeleton — connect GitHub, set a build command, get auto-deploys — is still the same shape, and that’s why I’ve kept the post around.
This is the initial setup for picking Netlify as a static host, wiring up a GitHub repository, and getting auto-deploys running. The screenshots are the original 2021 ones; the current Netlify dashboard has a different layout, so read them with that grain of salt.
The five things covered here are: account creation, repository connection, build configuration, two-factor authentication, and a look at the free tier. Custom-domain setup is in a separate post.
The services used
Short answer: GitHub for code, Netlify for static hosting — the minimal pair.
The reason is that Netlify watches GitHub and builds and publishes automatically when you push. You write locally, push, and check the result — a short loop.
The overall flow:
- Develop and write locally
- Push the source to GitHub
- Netlify picks it up, builds, and serves
Note: the steps below assume you already have a GitHub account with 2FA enabled.
Create a Netlify account
Short answer: sign in from the Netlify homepage with your GitHub account.
The reason is that wiring Netlify to GitHub via OAuth is shorter than running two separate accounts, and you don’t have to set up a Netlify password.
Open Netlify, and the screen below comes up — sign in with your GitHub account.

Note: as of 2026, Netlify has refreshed the UI, and the sign-up layout and button positions are different from this screenshot. The OAuth-with-GitHub flow itself is the same.
Connect a GitHub repository
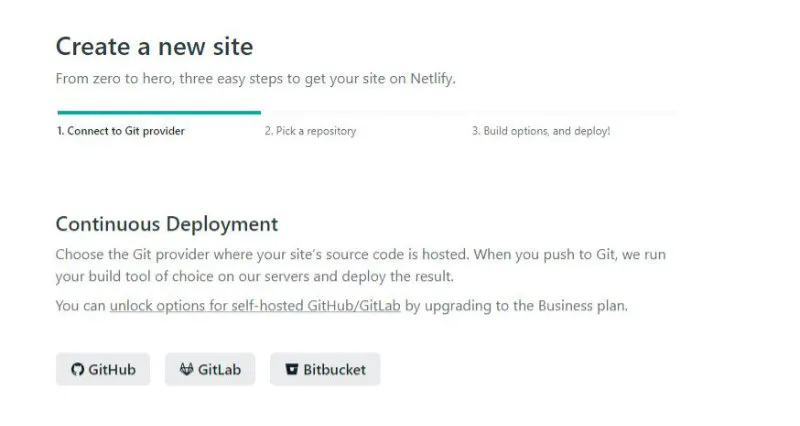
Short answer: from the dashboard, click New site from Git, pick GitHub, and select the target repository.
The reason is that Netlify is built around Git as the source of truth. Drag-and-drop from a local folder exists as a separate option, but if you want auto-deploys, Git is the prerequisite.
After signing in, New site from Git opens the deploy-source picker. Pick GitHub, then pick the repository.
Note: private repositories use the same flow. For organisation-owned repos, the organisation may have to approve the Netlify app on their side first.
Fill in the build settings
Short answer: set Branch, Build command, and Publish directory, then click Deploy site.
The reason is that those three fields are how Netlify decides which branch, how to build, and what to serve. They’re the only fields that really change with the framework (VuePress, Next.js, Astro, and so on).
Once you pick the repository, the build-settings screen comes up.
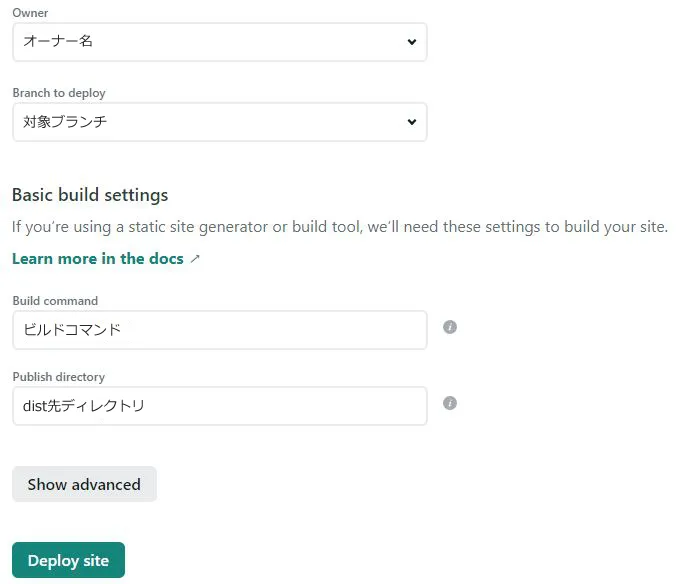
Example values for a VuePress site:
| Field | Example |
|---|---|
| Branch | master or main |
| Build command | npm run build (for VuePress) |
| Publish directory | docs/.vuepress/dist (VuePress default) |
After filling those in, click Deploy site and the build kicks off. When the status reads Published, the deploy worked.
Note: changing the build command after the fact and breaking the deploy is a classic mistake. Don’t casually edit a configuration that’s already working. Mistyping the publish directory by a single folder is enough to ship a blank page.
Auto-deploys and HTTPS
Short answer: push to the configured branch and Netlify builds automatically; HTTPS comes on by itself.
The reason is that Netlify wraps Let’s Encrypt internally, so even after a custom domain is attached, certificate issuance and renewal are handled for you. There’s nothing manual to do in the normal case.
In practice:
- Pushing to the configured branch triggers a build
- Once the build succeeds, the result is pushed to the serving CDN
- Attach a custom domain and Netlify issues the certificate automatically
Note: right after attaching a custom domain, propagation takes a while. At the time, it felt like roughly half a day to settle, though it depends on DNS propagation.
Turn on two-factor authentication
Short answer: open User settings, go to Security, and enable Two-factor authentication.
The reason is that this account holds the deploy keys and the custom-domain settings. If it gets taken over, the attacker can swap out a live site. Turning 2FA on at the start saves regret later.
Steps:
- Click your avatar in the top right and open User settings
- Click Security in the left menu
- Enable Two-factor authentication
Direct link:
https://app.netlify.com/user/security#two-factor-authentication/
Note: switching phones without backing up your authenticator app (Authy, 1Password, Google Authenticator, and so on) means you can lock yourself out. Keep the recovery codes somewhere separate.
About the free tier
Short answer: the Netlify Starter plan was 100GB of bandwidth and 300 build minutes a month (as of 2021).
The reason is that for a personal blog, if you keep image weight in check, the free tier just about covers you. Commercial use or high-frequency updates is a different conversation.
The Starter plan at the time:
- Bandwidth: 100GB / month
- Build time: 300 minutes / month
- Site count: personal-use range
For reference, dropping in lots of video or uncompressed PNGs eats both bandwidth and build time fast. Converting to WebP, or offloading images to an external image service, makes it easier to stay inside the free tier.
Note: pricing has been revised as of 2026. Check the official Pricing page for the current limits.
FAQ
Q. When a build fails, where do you look first?
A. The Build command output in the deploy log. When it builds locally but fails on Netlify, it’s usually a Node.js version mismatch, or a gap between package-lock.json and your environment variables.
Q. I changed the build command and the site disappeared — can I roll back? A. Open the Deploys tab, find a past successful build, and use Publish deploy to roll back. Roll back first, then fix the offending commit — that’s the safer order.
Q. Is custom-domain setup covered here? A. No. The steps for pointing an Onamae.com domain at Netlify are in a separate post.
Q. How does Netlify compare with Vercel or Cloudflare Pages? A. The core experience — auto-deploying a static site from GitHub — is close. The differences show up in pricing, build minutes, and the edge-runtime story. The reason I picked Netlify in 2021 came down to two things: Japanese-language docs were in better shape at the time, and VuePress sample configs were easier to find.
Closing
Netlify’s initial setup is OAuth into GitHub, pick a repository, type one line for the build command and one for the publish folder — that’s it. HTTPS and rebuilds are automatic, and the only things that really trip people up early on are mistyping the build command and forgetting to filter out their own PC from analytics.
Custom-domain setup is in a separate post. Analytics exclusion rules and how to pick an image host I’ll come back to another time.